
The Mikrotik BMU Integration allows you to use Mikrotik Routers already in your system as Powercode BMU (Bandwidth Management Unit) devices. Powercode uses the Mikrotik API to allow a Mikrotik BMU to rate limit, redirect traffic, and assign IP addresses via DHCP according to Customer Account information in Powercode in addition to the existing native Mikrotik functionality.
The Mikrotik BMU Integration requires deployment of a small server running Powercode’s Virtual BMU software for SNMP and Monitoring functionality.
Please reach out to Powercode support for recommended specifications if you intend to use this functionality.
Add a MikroTik BMU
The first step is to add the MikroTik RMU in to Powercode
- Navigate to Network->BMU Overview
- Click the “Add New BMU” button on the left
- Click the “MikroTik” button for “Type of BMU”
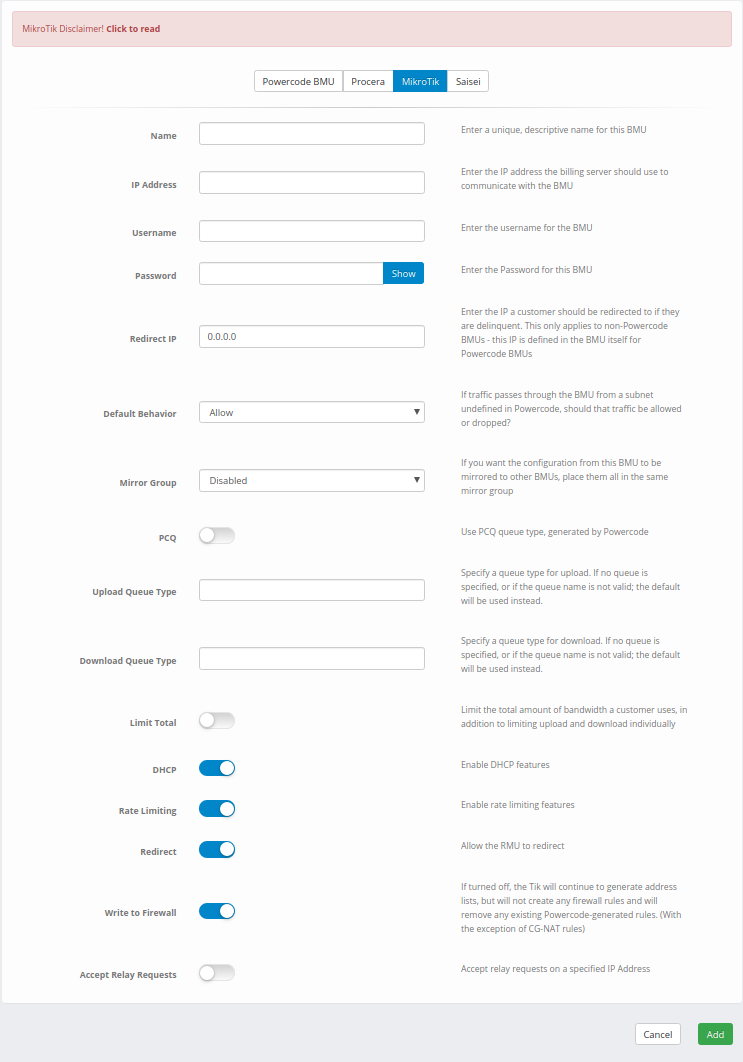
- Enter in the Name, IP Address, Username and Password of the MikroTik
- The account entered in to the MikroTik should have administrator access
- Enter in the IP address for “delinquent” and “contract” customers to be redirected to
- Select the applicable mirror group, if any
- Select which options to enable on this MikroTik (DHCP, Rate Limiting, Redirect And Accept Relay Requests)
- Enter in the IP Address to accept relay requests on if applicable
- Save your changes
Powercode will redirect you back to the BMU Overview screen.

Configure an Address Range
The next step is to configure an address range for your MikroTik
- In the dropdown menu on the left side of the MikroTik you just entered, select “Configure BMU”
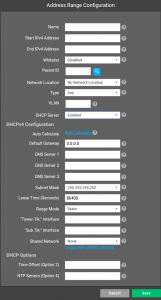
- Fill in the relevant information for your MikroTik
- If your MikroTik handles DHCP, you will need to select “Enabled” under “DHCP Server” and enter in the DHCP information as well
- On address ranges under a MikroTik or in a mirror group with a MikroTik, you will get an “interface” field for each MikroTik in the group. This is the port that the MikroTik will use for the DHCP Server with this address range
- Save your changes
On saving, Powercode will bring you back to the “IP Address Ranges” tab on the BMU Configuration page.

Add a Slave BMU (optional)
If you need to add a Powercode BMU as a slave, you may do so under the “Slave BMUs” tab on this page.
- Click the “Slave BMUs” tab
- Click the “Add New Slave BMU” button on the left
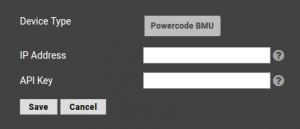
- Powercode BMU will be the only choice for a slave BMU
- Enter in the IP Address and API Key of the Powercode BMU
- Save your changes
Upon saving, Powercode will return you back to the “Slave BMUs” tab on the BMU Configuration page.

Synchronize the MikroTik
Now that you have configured the MikroTik and given it an address range, it’s time to synchronize the information with the MikroTik. This can be done either on the “Configure BMU” page, or the BMU Overview.
To synchronize at the “Configure BMU” page, simply click the “Synchronize BMU” button on the top left.
To synchronize the MikroTik from the BMU Overview:
- Navigate to Network->BMU Overview
- The MikroTik should be in “Good” status, and should have automatically populated the Model and Version fields.
- If the MikroTik is not in “Good” status, check to see that you have entered in the IP Address, Username and Password correctly.
- Click “Synchronize” under the MikroTik’s dropdown menu under “Action” on the right
![]()
Your MikroTik will change to “Synched” under “Sync State” after successfully pushing the information. If the MikroTik doesn’t synchronize, make sure all of the information you entered is correct and try again.
Add a MikroTik as a Slave (optional)
You can also add a MikroTik as a slave to a Procera RMU.
- Navigate to Network->BMU Overview
- Click on “Configure BMU” in the dropdown on the applicable Procera
- Navigate to the “Slave BMUs” tab
- Click on the “Add New Slave BMU” button on the left
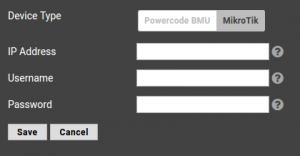
- You will notice that you now have th option of “MikroTik” in addition to “Powercode BMU”
- Click on “MikroTik” under “Device Type”
- Enter in the IP Address, Username and Password of the MikroTik
- Save your changes.
Upon saving, you will be redirected to the “Slave BMUs” tab of the Configure BMU page.
MikroTik Actions
| Powercode Action | MikroTik Action |
|---|---|
| Synchronize | Creates DHCP server, DHCP network, DHCP leases, DHCP options, simple queues, filter rules, NAT rules and Address list based on information entered and options selected |
| Change Customer Status | Adds or removes customer from delinquent list. |
| Add/Change Customer Service | Updates rate limits in customer’s queue |
| Add Customer Equipment | Adds DHCP lease and and queue for equipment |
| Edit Customer Equipment | Edits DHCP lease and queue for equipment |
| Delete Customer Equipment | Removes DHCP lease and queue for equipment |
| Update Service | Updates queues of customers on this service |
| Delete Service | Deletes or updates queues of customers depending on option selected while deleting service |
| Update Address Range | Updates DHCP server, DHCP network and address list for range. Then updates customers on that address range |
| Delete Address Range | Removes DHCP server, DHCP network and address list for range |